 Vanilla Bean Scones //
My kids and I love the little Vanilla Bean Scones at Starbucks. Unfortunately, we don’t get them too often, because they tend to run out early in the day. They’re delicious (and clearly we aren’t the only ones who think so)!
Having never made scones before, I decided to search for a ‘copycat’ recipe online. Lucky for me, I came across one that The Pioneer Woman posted some time ago. I wouldn’t describe the recipe as quick and easy, friends… rather, I think it’s a bit labor intensive. (Sort of like the work involved in making homemade sugar cookies, cutting them out, frosting them, etc.) There’s lots of love that goes into creating these little gems, but it makes them absolutely irresistible!
I’m sort of at a loss for words in describing them, but in my (“expert” of all-things-sweet) opinion, they’re the perfect flakey scone texture! The glaze compliments the slightly sweet biscuit, sealing in the moisture. However, the star of the scone is definitely the vanilla bean! Did you know that there are usually 25,000 tiny vanilla seeds in one scraped vanilla bean pod? Amazing! Well, all of those mini flecks add the most intense flavor!
{Since there are many steps to making these little scones, I thought I’d write less and let the photos do the talking. If you are unfamiliar with how to scrape a vanilla bean, start by watching this short video by Martha Stewart.}
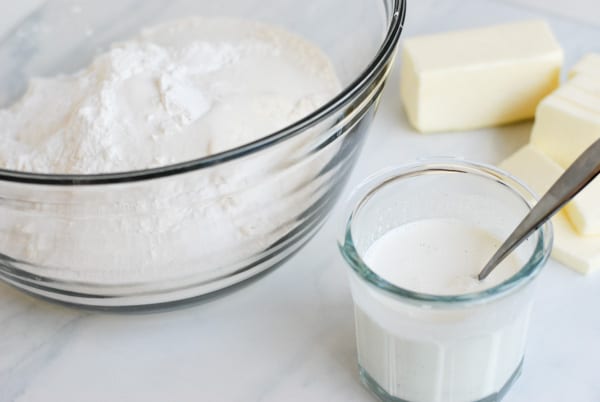
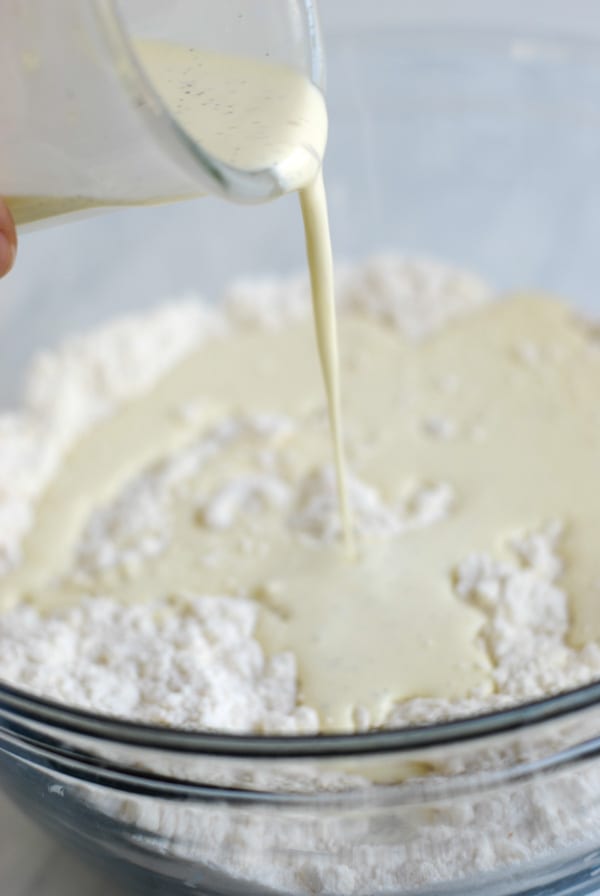
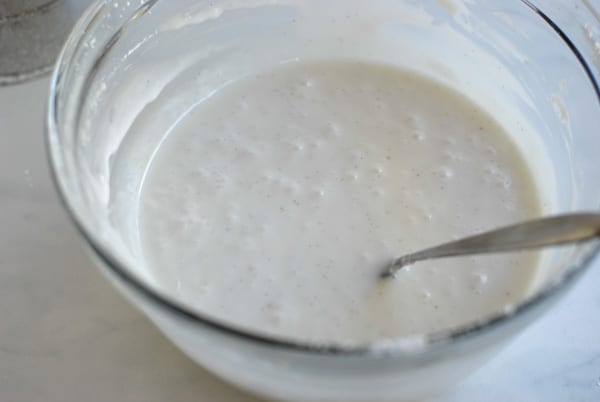
Add the seeds of two scraped vanilla beans to the heavy cream, allowing to sit for several minutes to soak in the flavor. You can also add in the actual scraped pod, to increase the overall vanilla flavor (just remove prior to pouring into the dry ingredients).
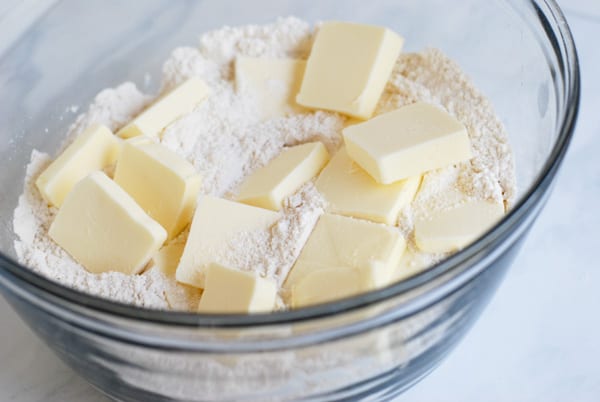
Mix the dry scone ingredients, using a fork, until combined. Cut the unsalted cold butter into slices/chunks. Using a pastry cutter or two knives (which I used), cut-in the butter, until pea-sized coarse crumbs form. (Watch this video for the how-to!)
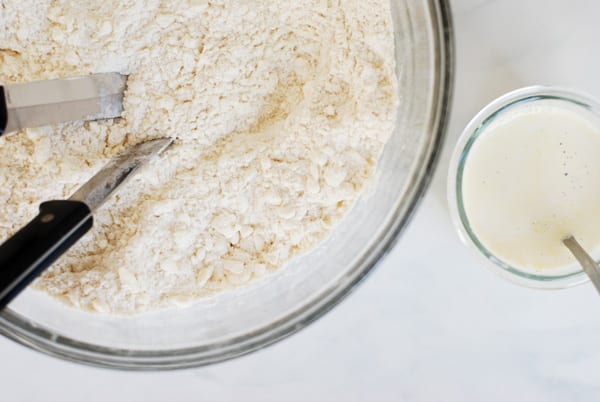
Add one large egg to the vanilla cream mixture, beating lightly with a fork. Pour onto the butter/flour mixture, stirring until just combined.
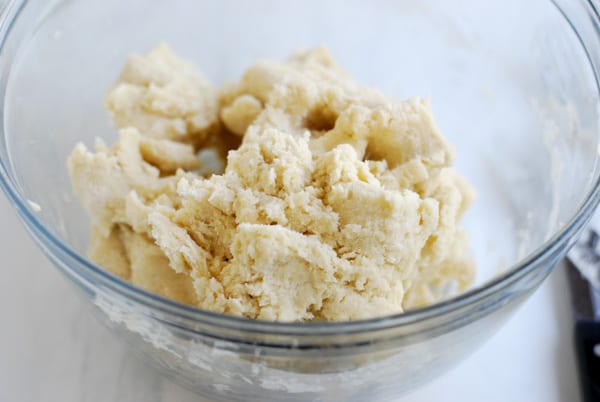
Using a fork, or your clean hands, take a minute to incorporate the wet and dry ingredients. (The dough should still be a bit crumbly.)
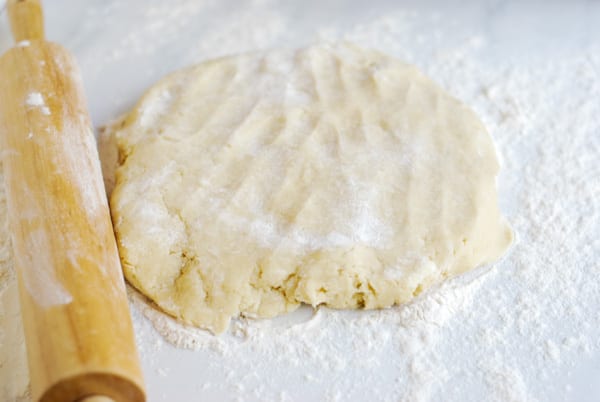
Put the dough onto a lightly floured surface and press it together until it forms a rustic rectangle. Use a rolling pin to roll into a rectangle, until dough is about 1/2 inch to 3/4 inch thick. Use your hands to help with the forming, if need be.
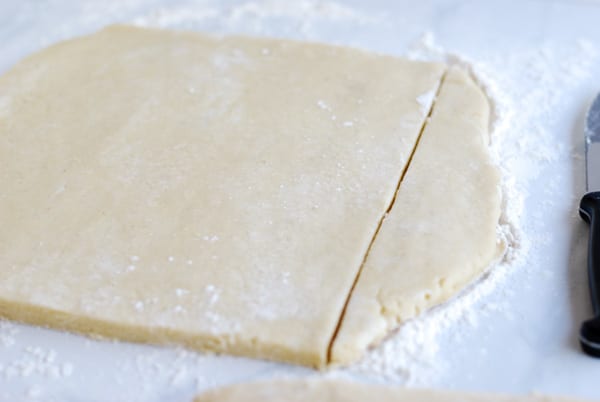
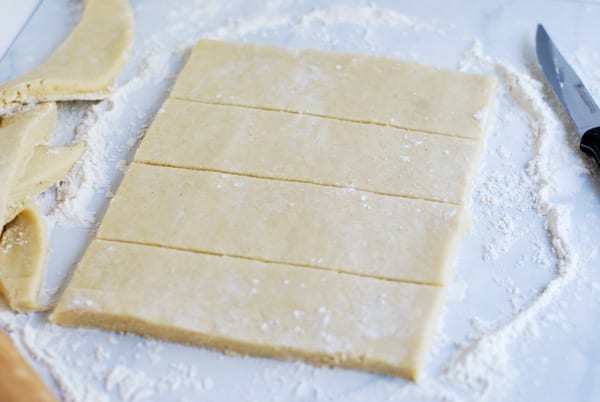
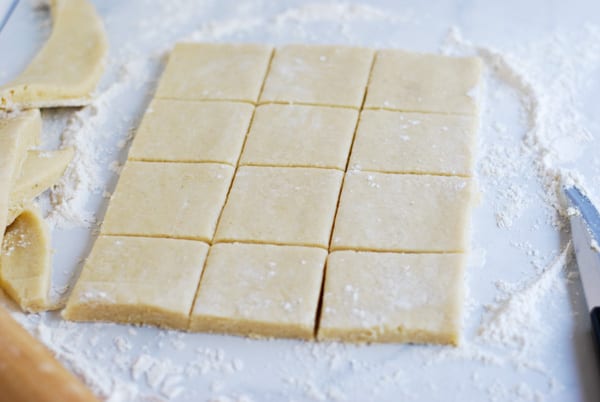
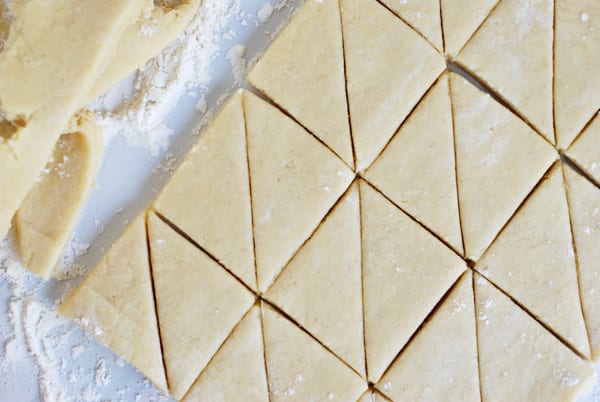
Use a knife to trim into a symmetrical rectangle, then cut the rectangle into 12 symmetrical squares/rectangles.
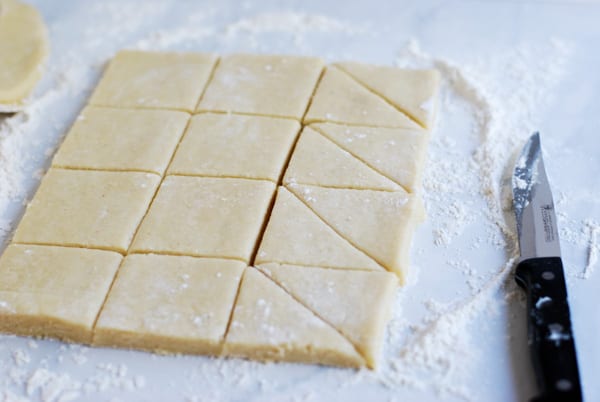
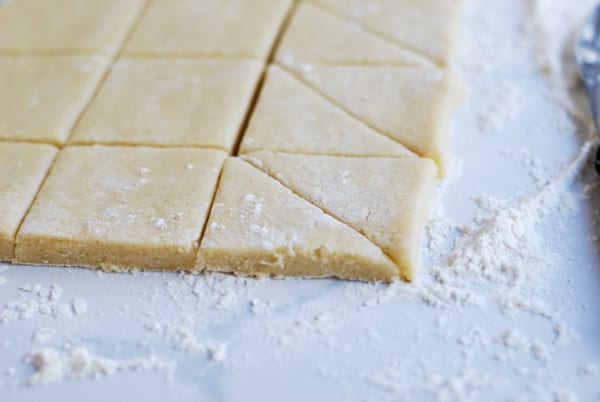
Next, cut each square/rectangle in half diagonally, to form two triangles, like so…
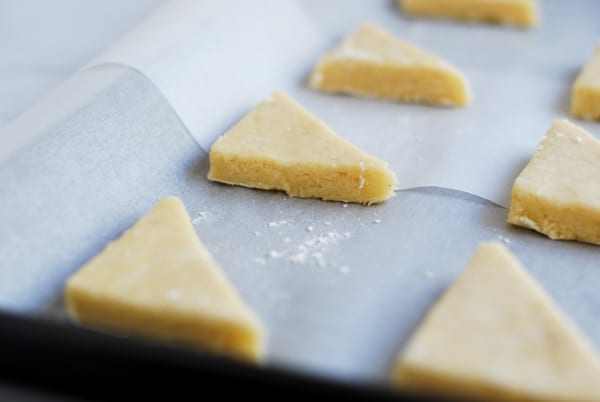
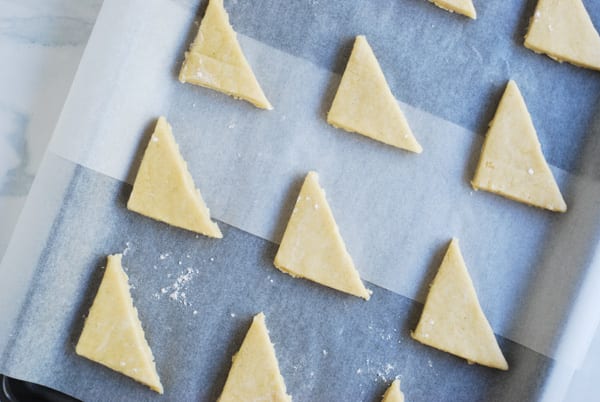
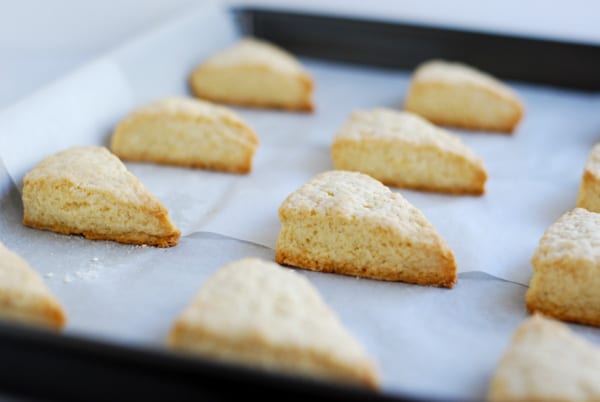
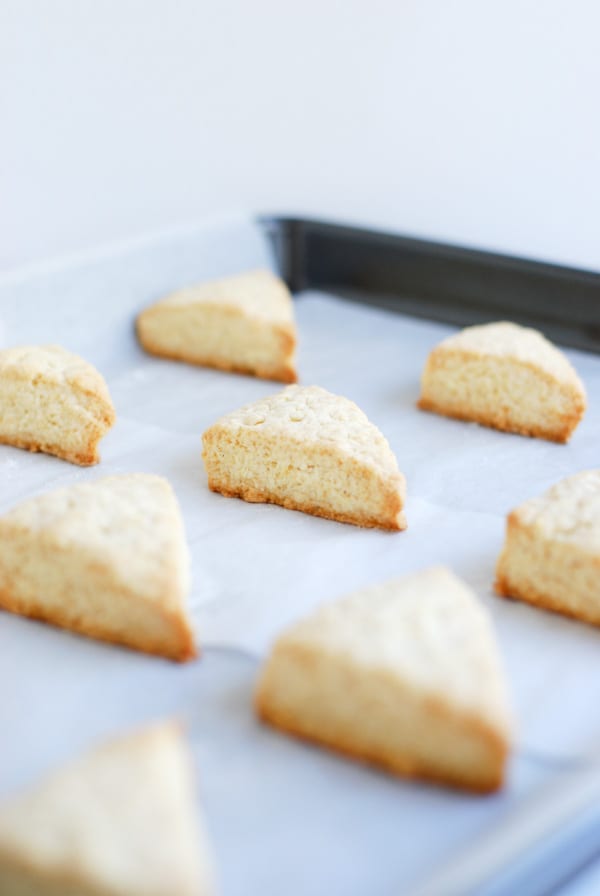
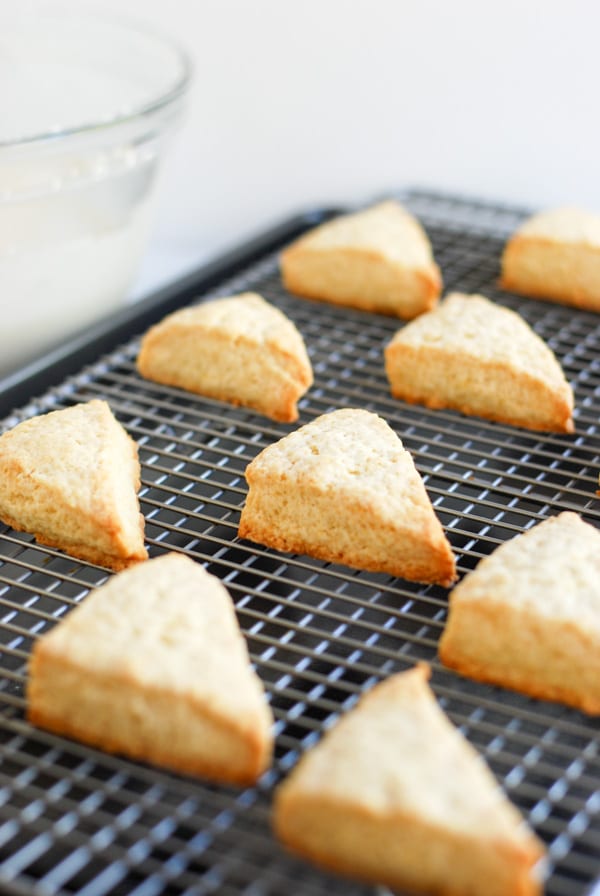
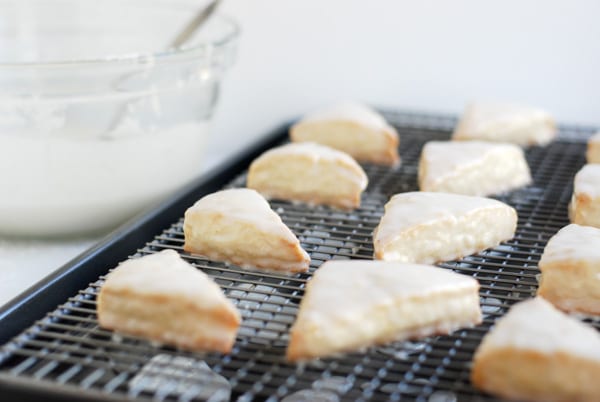
Transfer the scone triangles onto a parchment paper lined cookie sheet and bake for 15-18 minutes (until edges and bottom are a light golden brown).
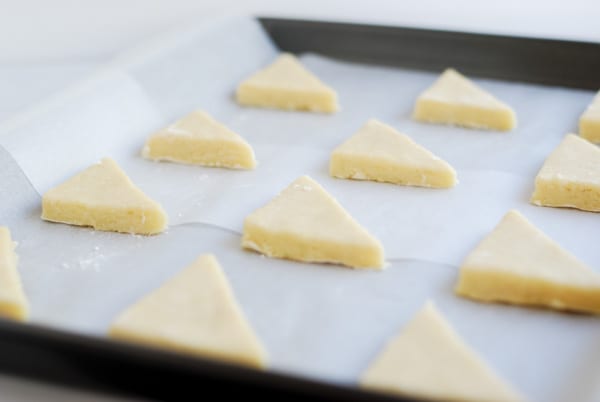
Allow scones to cool for 15 minutes on the cookie sheet, then transfer to a cooling rack to cool completely.
{While the scones are cooling, begin making the vanilla glaze.} Split one vanilla bean in half lengthwise and scrape out the seeds. Stir vanilla bean seeds into milk; allow to sit for a few minutes.
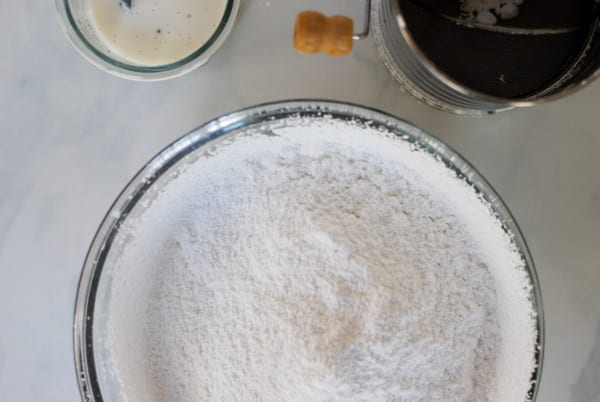
Mix the powdered sugar with the vanilla milk, adding more powdered sugar or milk if necessary to get the consistency to the right medium-thickness. Stir or whisk until completely smooth.
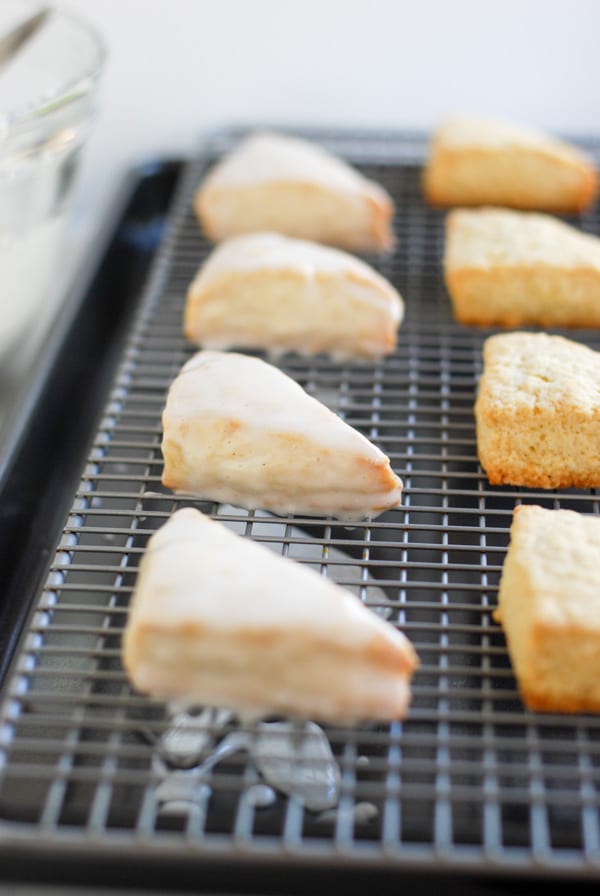
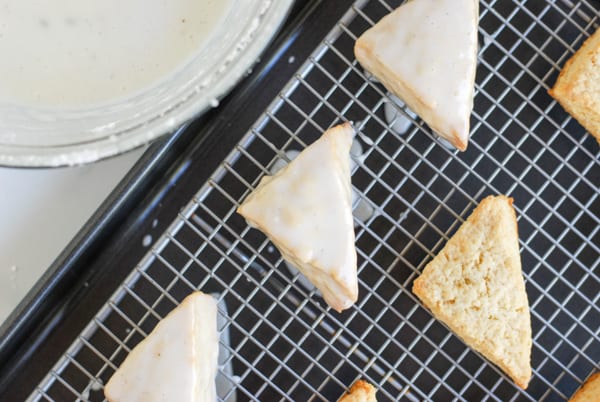
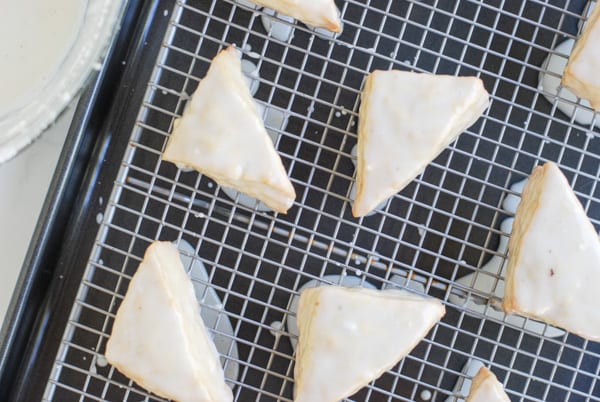
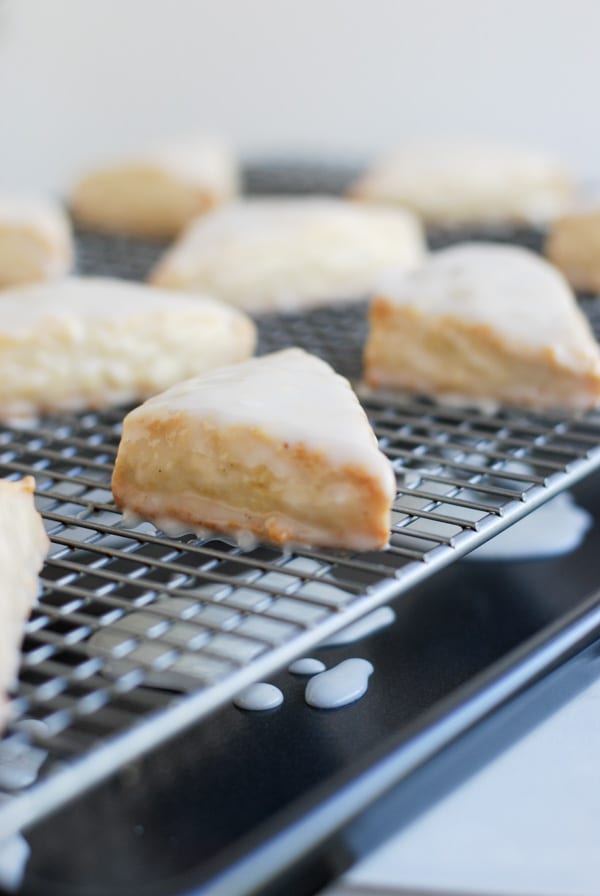
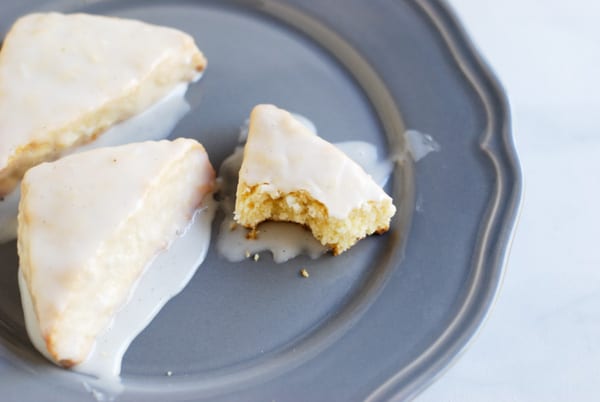
Next, carefully drench each cooled scone by dunking into the vanilla bean glaze. Transfer to parchment paper or the cooling rack. Allow the glaze to set completely, about an hour. (If you need it to set quicker, simply refrigerate.)
Side Note // If a scone swimming in icing isn’t your thing, then you can cut the glaze recipe in half, and use it to drizzle over each scone. They turn out beautiful!


Vanilla Bean Scones
Ingredients
- SCONES //
- 3 cups all-purpose flour
- 2/3 cups granulated sugar
- 5 teaspoons baking powder
- 1/4 teaspoon sea salt
- 2 sticks 1/2 pound unsalted butter, chilled
- 1 large egg
- 3/4 cups heavy cream
- 2 whole vanilla beans scraped
- GLAZE //
- 5 cups powdered sugar sifted
- 1/2 cup whole milk
- 1 whole vanilla bean
- dash of sea salt
Instructions
- Preheat oven to 350 degrees.
- Split the vanilla beans down the middle lengthwise and scrape out all the vanilla seeds inside. Stir the scrapings into the cream. Set aside for 15 minutes.
- Sift together flour, 2/3 cup sugar, baking powder, and salt.
- Cut cold butter into pats, then use a pastry cutter or two knives to cut the butter into the flour. Continue for a few minutes until the mixture resembles coarse crumbs.
- Using a fork, lightly beat the egg into the vanilla cream mixture. Pour onto the flour mixture; stir gently with a fork just until it comes together. (If you're having trouble combining, use clean hands to help.)
- Put dough onto a lightly floured surface and press it together until it forms a rough rectangle. (Mixture will be pretty crumbly.) Use a rolling pin to roll into a rectangle about 1/2 inch to 3/4 inch thick. Use your hands to help with the forming if necessary.
- Use a knife to trim into a symmetrical rectangle, then cut the rectangle into 12 symmetrical squares/rectangles. Next, cut each square/rectangle in half diagonally, to form two triangles.
- Transfer to a parchment paper lined cookie sheet and bake for 15-18 minutes (until edges and bottom are a light golden brown). Allow to cool for 15 minutes on the cookie sheet, then transfer to a cooling rack to cool completely.
- VANILLA GLAZE
- While scones are cooling begin making the glaze.
- Split one vanilla bean in half lengthwise and scrape out the seeds. Stir vanilla bean seeds into milk; allow to sit for awhile. Mix powdered sugar with the vanilla milk, adding more powdered sugar or milk if necessary to get the consistency the right thickness. Stir or whisk until completely smooth.
- One at a time, carefully dunk each cooled scone in the glaze, turning it over, if desired. Transfer to parchment paper or the cooling rack. Allow the glaze to set completely, about an hour. Scones will keep several days if glazed. Enjoy!
Notes
I hope that you enjoy these dainty vanilla scones with a good cup of coffee over breakfast, or as an afternoon snack with a cup of tea! Or… even better, maybe you’ll whip up a batch as a little Valentine’s Day treat for your sweet ones!

I can personally let you know that these little tasty treats are buttery, sweet, and so delicious!
Sweet Sara brought some by and it brought big smiles and begging for more from my little ones:) thank you for sharing. You truly have a gift for baking!
Oh, Jam! You’re the sweetest! So glad that you and the boys liked them! It was a good excuse to drop by and chat for a minute in person! Love you, friend! xoxo
These look SO yummy!!! I want to try them so bad! Vanilla bean scones are my favorite. Thanks for sharing and have a great weekend! 🙂
Hello, Amanda! Thanks so much for your sweet comment! Hope you try out the recipe! Your blog is gorgeous, BTW! After reading your ‘about’ section, I’ve decided we have so much in common! Love my psych background… but I’m also crazy about graphic design and just creating pretty things! I hope to do more of that in 2015! Thanks, for stopping by! xo, Sara
These look WONDERFUL!!
Thanks so much, Brenda! You’re too kind! xoxo
YUM! I’m sitting here sipping on my coffee, wishing I had a couple of these in hand. Pinning!
Perfect with a cup of coffee, my friend! I’m wishing I had a few leftover this morning…. but of course, they didn’t last very long in our house! Hope you are well! xoxo
These look yummy, planning to do these for my practical
hope i”ll get good results when my teacher taste these. thanks for the idea and easy recipe 🙂
Hello Abbegale! Hope the recipe turned out great! xo
Can you be more specific about the content of your article? After reading it, I still have some doubts. Hope you can help me.
This is my first time pay a quick visit at here and i am really happy to read everthing at one place
You’ve articulated this so perfectly.
I really like reading through a post that can make men and women think. Also, thank you for allowing me to comment!
I don’t think the title of your article matches the content lol. Just kidding, mainly because I had some doubts after reading the article.
I do not even understand how I ended up here, but I assumed this publish used to be great
Looking forward to your next post. Keep up the good work!
Van Haberleri tarafsız haber yayıncılığı anlayışıyla doğru ve güvenilir bilgilere ulaşmanızı sağlar. Van Sesi Gazetesi yıllardır Van ve çevresinde güvenilir haberleri sunma konusundaki kararlılığıyla bilinir. Van Olay, Van Gündem, Van Haber, Van haberleri, Gündem haberleri, van erciş, van gevaş, van edremit
Dipays Dijital Pazarlama AjansıE-Ticaret Danışmanlığı
I don’t think the title of your article matches the content lol. Just kidding, mainly because I had some doubts after reading the article.
Robocombo Teknolojiarduino, drone ve bileşenleri
I’m now a loyal reader and frequent visitor. Your blog is a genuine discovery for me, consistently delivering high-quality content and profound depth on subjects I care deeply about. Thank you for cultivating such a valuable online space.
Top Reinigungsfirma in München – schnell, gründlich und preiswert
ФизиотерапияФизиотерапия, Рехабилитация, Мануална терапия, Хиропрактика, Лечебен масаж, Иглотерапия, Хиджама (Кръвни вендузи), Лазерна епилация, Антицелулитен масаж, Антицелулитни терапии
Алуминеви Мебели за Хотели и Заведения Столове и фотьойли, Офис столове, Кресла, Бар столове, Пуфове и табуретки, Дивани (заведения / дом)
Pretty! This has been a really wonderful post. Many thanks for providing these details.
I very delighted to find this internet site on bing, just what I was searching for as well saved to fav
Your article helped me a lot, is there any more related content? Thanks!
If you’re planning a trip to Egypt, don’t miss the Bahariya Oasis. It offers breathtaking views and a once-in-a-lifetime adventure, especially for nature lovers.
إذا كنت تبحث عن تجربة مميزة في دردشة الخليل توفر لك التواصل مع الأصدقاء والتعارف مع أشخاص جدد من مختلف أنحاء فلسطين، فإن منصتنا تقدم لك كل ما تحتاجه. يمكنك الآن الانضمام بسهولة إلى شات فلسطيني اونلاين والاستمتاع بمحادثات آمنة وسريعة. استكشف الغرف المتنوعة وشارك في النقاشات الممتعة عبر دردشة فلسطين للجوال. جرب الخدمة الآن من خلال هذا الرابط: https://play.google.com/store/apps/details?id=com.chat.chatpaestine&pli=1
Rainx Drive is the Best Cloud Storage Platform
Nice article! I especially liked the actionable checklist.
I love the personal examples — they made the advice relatable.
Solid post — bookmarked and shared. Keep producing content like this!
Can you be more specific about the content of your article? After reading it, I still have some doubts. Hope you can help me.
Solid post — bookmarked and shared. Keep producing content like this!
Thanks for including real user stories — very relatable.
Pretty! This has been a really wonderful post. Many thanks for providing these details.
I love the practical tips in this post. Can you recommend further reading?
팬티 훔쳐서 냄새맡고 딸딸이침
여고생이라고 속이고 만났는데 30대 ㅋㅋ
전희 1시간만해도 오르가즘 느낌
풀발로 항문까지 핥아줌
스와핑커플 만났는데 아내 보지 내가쑤시니까 남편좆물싸네 ㅋㅋ
스타킹찢으면서 후배위로 떡치니까 년이 스퀴트함
펨돔여신 발바닥에 좆물싸니까 핥으라해서 핥음 ㅅㅂ중독
콘돔없이 노콘함
립카페가서 젖빨아달라했더니 5천원더 ㅋㅋ빨아줌
교복입은년한테 크림파이함
토토 또 먹튀당함 30만 날리고 개빡쳐서 사이트주인 좆물싸고싶음
미유년 젖작아서 아쉬움
휴게텔 풀발에 빠구리까지 해줘서 좆꼴아서 2연속사정
보지물먹고싶어서 얼굴에앉힘
아가씨 보지 타이트해서 좋음
어제 오피가서 보지 쑤셔주니까 좆물싸고 노콘으로 크림파이 ㅅㅂ개꼴림
딜도 25cm 박았는데 항문찢어져서 피남 ㅅㅂ
가슴빨면서 젖꼭지물어뜯음
귀두만 핥아줘도 사정할뻔
사까시 잘해주는 오피 강남 5번
조교당하면서 좆물싸니까 주인님 칭찬해줌
어제 오피가서 보지 쑤셔주니까 좆물싸고 노콘으로 크림파이 ㅅㅂ개꼴림
여고생이라고 속이고 만났는데 30대 ㅋㅋ
로리 교복여고생 코스프레 보니까 좆서서 딸딸이쳤음
딜도 2개 동시박음
펨돔여신 발바닥에 좆물싸니까 핥으라해서 핥음 ㅅㅂ중독
리밍해달라했더니 혀로 항문핥아줌 ㅋㅋ개변태
가슴빨면서 젖꼭지물어뜯음
후배위로 항문박음
very informative articles or reviews at this time.
Nice post. I learn something totally new and challenging on websites
I love the personal examples — they made the advice relatable.
Thank you — the troubleshooting tips saved me from major issues.
Awesome! Its genuinely remarkable post, I have got much clear idea regarding from this post
Nice work! I shared this with colleagues who will appreciate it.
Nice post. I learn something totally new and challenging on websites
I like how you addressed common mistakes — very practical advice.
I appreciate the balanced view — you didn’t oversell the solution.
I very delighted to find this internet site on bing, just what I was searching for as well saved to fav
For the reason that the admin of this site is working, no uncertainty very quickly it will be renowned, due to its quality contents.
For the reason that the admin of this site is working, no uncertainty very quickly it will be renowned, due to its quality contents.
This is really interesting, You’re a very skilled blogger. I’ve joined your feed and look forward to seeking more of your magnificent post. Also, I’ve shared your site in my social networks! lüleburgazda nakliyat
I truly appreciate your technique of writing a blog. I added it to my bookmark site list and will
Tried BG88Bet recently. Decent variety of games, especially if you’re into slots. The bonuses are okay, nothing groundbreaking. It’s a reliable choice, though! Go to bg88bet.
I truly appreciate your technique of writing a blog. I added it to my bookmark site list and will
Just signed up for PHJL8! The welcome bonus is nice. Going to try a few slots and see how it goes. Hopefully, I’ll hit the jackpot! Check it out for yourselves: phjl8
I’m often to blogging and i really appreciate your content. The article has actually peaks my interest. I’m going to bookmark your web site and maintain checking for brand spanking new information.
1wincassino, I’ve heard of it, yeah. Nothing particularly stood out, but nothing bad either. Standard online casino stuff, plenty of games to choose from. See if it’s your thing: 1wincassino
For the reason that the admin of this site is working, no uncertainty very quickly it will be renowned, due to its quality contents.
I’m often to blogging and i really appreciate your content. The article has actually peaks my interest. I’m going to bookmark your web site and maintain checking for brand spanking new information.
Nice post. I learn something totally new and challenging on websites
Very useful for understanding expectations in developed markets
Find Files Instantly on macOS: A Step-by-Step Guide https://filescaner.netlify.app
Good post! We will be linking to this particularly great post on our site. Keep up the great writing https://heosexhay.net/
Find Files Instantly: The User-Friendly Guide https://fastdl.pythonanywhere.com
Your point of view caught my eye and was very interesting. Thanks. I have a question for you.
Find Files Instantly: Simplify Your File Management https://fastdl.pythonanywhere.com
Stop Wasting Time: Find Files Instantly, Guaranteed https://voidtools.surge.sh
File Finder Tool for Windows/Mac: Find Files Instantly (Replace with OS) https://filefinders.netlify.app
How Do I Find Files Instantly on My Computer? https://fastdl.pythonanywhere.com
Find Audio Files Instantly: Your Music Collection at Your Fingertips https://filescaner.netlify.app
I enjoyed how approachable this article feels. The topic is explained in a straightforward manner without unnecessary complexity. It’s refreshing to read something that feels informative and honest, rather than exaggerated or overly optimized for attention.
A well-thought-out and informative post. The explanations are clear, and the overall tone is calm and professional. It’s easy to see that the author put effort into making the content useful and readable.
Makaleniz açıklayıcı yararlı anlaşılır olmuş ellerinize sağlık
gerçekten çok yararlı bi konu teşekkürler
Your blog has become my go-to source for inspiration and motivation Thank you for consistently delivering high-quality content
bu konuda bu kadar net bilgiler internette malesef yok bu yüzden çok iyi ve başarılı olmuş teşekkürler.
This is really interesting, You’re a very skilled blogger. I’ve joined your feed and look forward to seeking more of your magnificent post. Also, I’ve shared your site in my social networks!
Bu güzel bilgilendirmeler için teşekkür ederim.
I truly appreciate your technique of writing a blog. I added it to my bookmark site list and will
I like the efforts you have put in this, regards for all the great content.
Hi there to all, for the reason that I am genuinely keen of reading this website’s post to be updated on a regular basis. It carries pleasant stuff.
Great perspective — I hadn’t considered that angle before.
Xem phim sex clip sex Việt Nam không che mới nhất được GaiDamVL tuyển chọn, cập nhật liên tục mỗi ngày.
Well done, it’s helpful.
Thanks for sharing. I read many of your blog posts, cool, your blog is very good.
gerçekten güzel bir yazı olmuş. Yanlış bildiğimiz bir çok konu varmış. Teşekkürler.
sitenizi takip ediyorum makaleler Faydalı bilgiler için teşekkürler
naturally like your web site however you need to take a look at the spelling on several of your posts. A number of them are rife with spelling problems and I find it very bothersome to tell the truth on the other hand I will surely come again again.
naturally like your web site however you need to take a look at the spelling on several of your posts. A number of them are rife with spelling problems and I find it very bothersome to tell the truth on the other hand I will surely come again again.
I am truly thankful to the owner of this web site who has shared this fantastic piece of writing at at this place.
Faydalı bilgilerinizi bizlerle paylaştığınız için teşekkür ederim.
aramalarım sonunda buraya geldim ve kesinlikle işime yarayan bir makale oldu. teşekkür ederim
There is definately a lot to find out about this subject. I like all the points you made
Hocam Ellerinize Saglık Güzel Makale Olmuş Detaylı
Good post! We will be linking to this particularly great post on our site. Keep up the great writing
This is really interesting, You’re a very skilled blogger. I’ve joined your feed and look forward to seeking more of your magnificent post. Also, I’ve shared your site in my social networks!
Nice post. I learn something totally new and challenging on websites
gerçekten güzel bir yazı olmuş. Yanlış bildiğimiz bir çok konu varmış. Teşekkürler.
Phim Heo HD, Xem Phim Heo Gái Bướm Múp Không Che Hay Nhất
Esenyurt Doğuş Korsan Taksi
Beylikduzu Korsan Taksi Hizmeti
Reliable iptv belçika content should cover consistent server performance. This creates a better first impression.