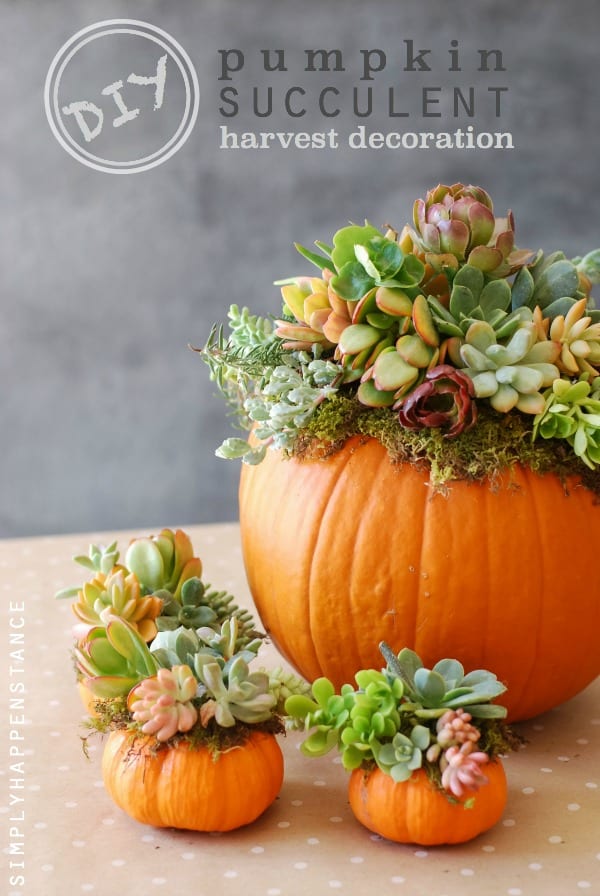
 DIY Pumpkin Succulent Harvest Decoration //
Hello, friends! About two weeks ago, I posted a photo of the pumpkin succulent arrangement my crafty mom brought over to me. It was such a hit on my personal Instagram and Facebook page, that I decided a tutorial was necessary. My sweet mama came over with the supplies, and I photographed her in action!

There are so many things I LOVE about this project! The first, obviously being, that I was able to create this with my mom! I also love that it’s super simple, completely gorgeous, and is a “green” project {not wasting or harming the plants in order to create this lovely harvest piece}.
{This arrangement would make the most perfect hostess gift for Thanksgiving, or a great centerpiece for a fall gathering, in which you’re entertaining. It would also be a thoughtful, handmade gift for family, friends, teachers, or coworkers.}
Unlike many of the pumpkin succulent pieces you may have seen floating around the web or Pinterest… there is no need to actually cut into the pumpkin. {Unbelievable, right?} The steps are easy, and explained below in a tutorial with pictures. I’ve also included helpful tips {from my mom!} for keeping your harvest decoration looking great, and ideas for planting the top of Mr. Pumpkin when he starts to expire.

SUPPLIES YOU’LL NEED //
- Pumpkin(s)
- Spray Adhesive
- Glue Gun with Glue Sticks
- Moss
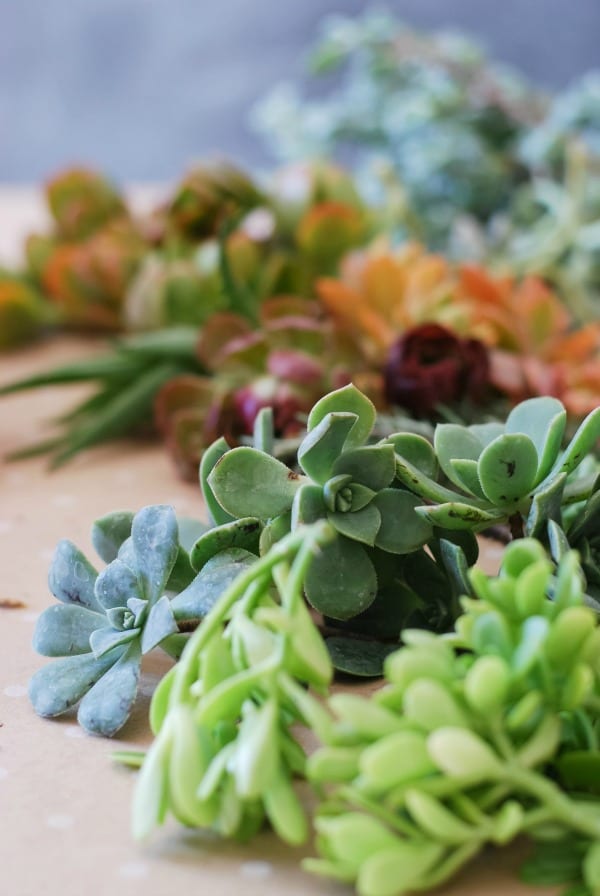
- Succulent Cuttings (a variety of kinds/colors)
TIP// If you don’t have a variety of succulent plants growing where you live, you can buy them at your local nursery or hardware store, such as Home Depot or Lowes, in the plant section. A day or so before doing this project, make your succulent cuts, allowing the ends to dry out.
{The pumpkin and succulents can be purchased at a Hardware store, while the spray adhesive, glue gun/glue sticks, and moss can be bought at your local craft store, such as Michael’s.}
OPTIONAL SUPPLIES //
- Gloves (when applying the moss sprayed with adhesive)
- Butcher Paper or Newspaper (to protect your work surface)

Begin by prepping your work space. You may want to lay down some butcher paper/newspaper to protect your work surface… Also, if working inside, make sure it’s a well ventilated area since you’re using spray adhesive.
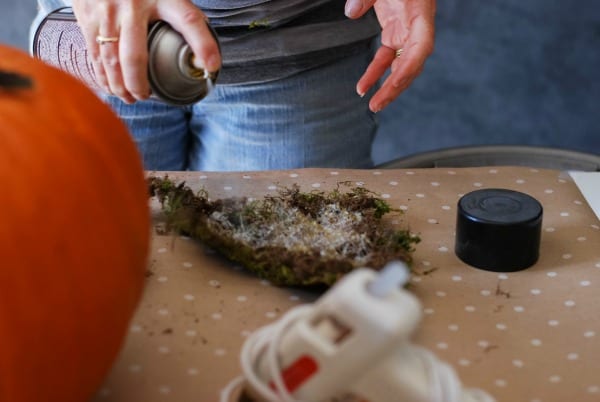
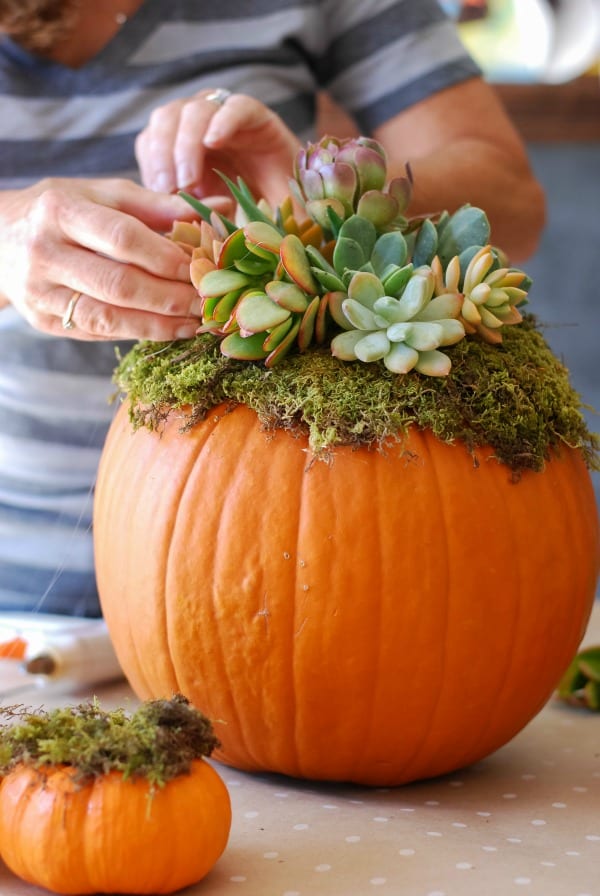
In small sections, spray the moss with an even layer of spray adhesive. Quickly place onto the top of the pumpkin {almost giving Mr. Pumpkin a hat!}, pressing down firmly, for a few seconds, to ensure that the moss sticks.


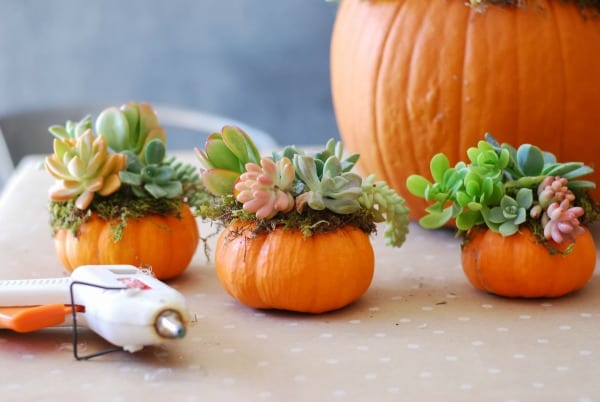
Repeat the process with all of the pumpkins that you are decorating.


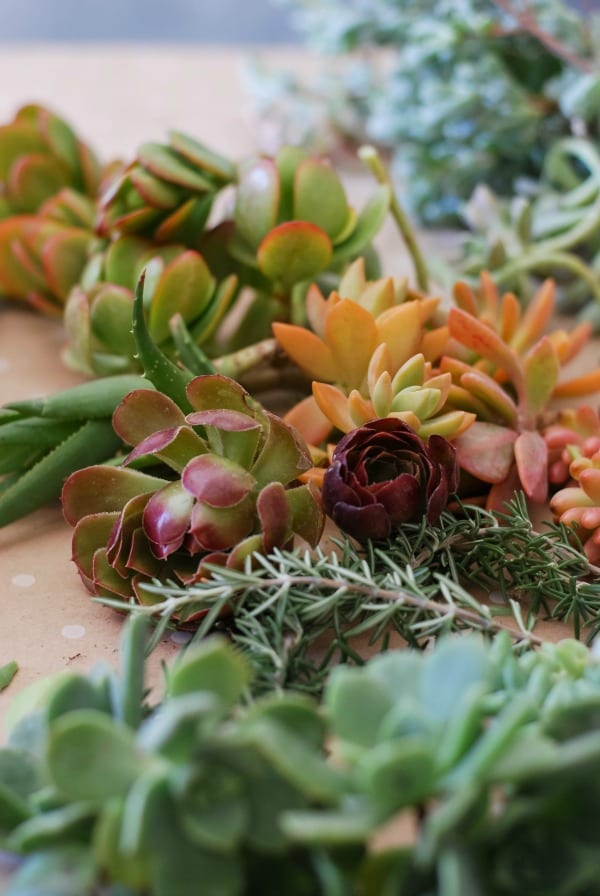
Once your pumpkin tops are covered with a decent layer of moss, warm up your glue gun, and gather your succulent cuttings {making sure you have an assortment of colors and variety}.
Now for the fun part! One-by-one, using your warmed up glue gun, glue the bottoms/ends of the succulent cuttings into the moss. Make sure you hold each piece, while gluing, for a few seconds so that it properly adheres.


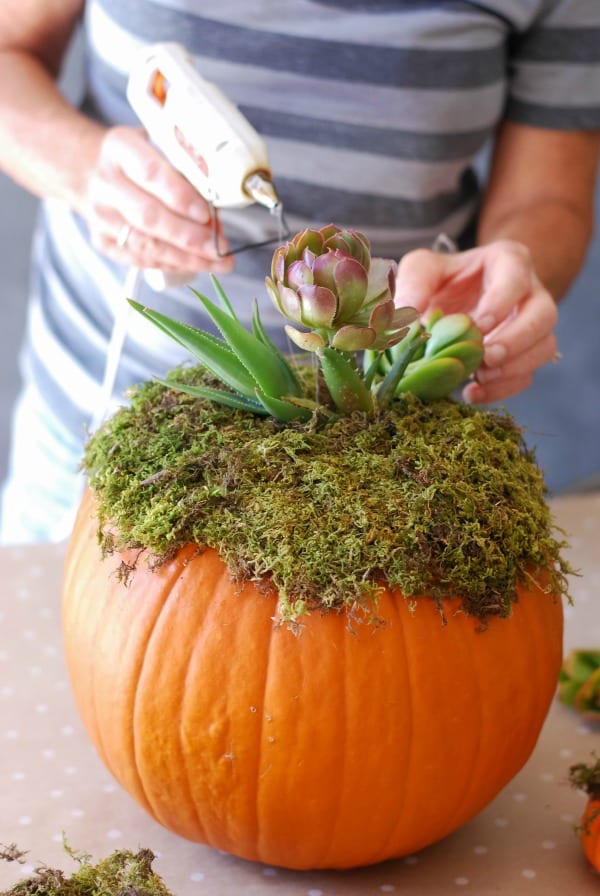
Make sure that you are moving around Mr. Pumpkin, so that all sides are equally adorned and beautiful!


Don’t be afraid to use all sorts of succulent cuttings: different colors, shapes, sizes, and textures. It only adds more interest and charm. Tuck pieces in as you go… making the top of the pumpkin full and vibrant!

I loved watching the arrangement come together! I was blown away at how gorgeous it was… and I couldn’t get enough of those tiny pumpkins! In fact, my mom went home and made 10 more to give to her dinner guests. What a lovely gift!


HELPFUL TIPS //
- To maintain your pumpkin succulent arrangement, mist daily with clean water, using a water bottle {but wait to do so for 24-hrs, after initial gluing}.
- Since the pumpkin wasn’t cut into…. the arrangement should last for a couple of months, if taken care of properly. The succulent roots will begin going into the moss, and eventually into the pumpkin itself {as the shell begins to soften}.
- Once Mr. Pumpkin starts to deteriorate, carefully cut off the top of the pumpkin {the part containing the succulent arrangement}, and plant into an appropriately sized pot with soil, or into your garden. How terrific is that?!
- In climates that do not freeze, you can enjoy this arrangement year round, inside or out!
ADDITIONAL INFORMATION ABOUT SUCCULENTS //
- Succulents are very drought resistant, needing water infrequently after they’re established in a pot, or in your garden.
- The cuttings from succulent pruning can root and grow into new plants. Simply plant the cuttings in a pot of moist potting soil and keep the soil moist until the cuttings root and show signs of new growth. {This is known as propagating succulents — get the information on how to do this here}!
- Succulents come in a variety of natural colors; however, they can flower in bold, beautiful shades!
- Succulents attract butterflies, bees, and hummingbirds — depending on the type.
A huge ‘thank you’ to my mom, for not only making me my first beautiful pumpkin succulent arrangement, but for also being willing to do the tutorial, for the blog, to share with our lovely readers! I keep trying to convince her of staring her own blog and opening an etsy shop, since she is so wildly creative. When she does, I’ll let you all know… Thanks, Mom! I love you!

This is great!!!!! I’m going to make this for my daughters teachers!!!! I love this!!!!
So awesome, Stephanie! Such a great idea for the girls’ teachers… and for your girl scout troop! LMK how they turn out! xoxo
This is my second year making these…Thanks for sharing…..I’ve given most of them away,this year I’m keeping one for my home….
I can’t tell you how excited I am to try this out, this year! Thanks Sara and mama dil for taking the time to share it! Happy Fall!
You will love it, Vannote! The one my mom originally made me still looks beautiful with minimal maintenance! I LOVE that you just called her “mama dil!” That seriously cracked me up!!! Love you so much, my friend! 4-ROOM FOREVER!!! xo
Where is the glue being put on the cuttings? Will it dosruot yheir geowth if pit on the very end? Love these!!!
Sorry for All of the errors… typing Fast. Where should the hot glue be Put to Avoid disrupting their gRowth?
Hi Christina! Yes… you can hot glue the bottom where it was cut. Just make sure to let your clippings dry out for a day or two prior to doing the project! Thanks for your comment! XO
SO, so pretty!!
Thanks so much, Rebecca! xoxo
so pretty and I love that you don’t actually cut the pumpkin so it lasts a long time!
That’s the best part, I agree, Jane! Glad you like it… and hope you make one for yourself! xo
I cannot get over how gorgeous these are! Such a beautiful idea and as you said, would make a perfect centerpiece for Thanksgiving or a gift for the host. My mom is actually coming to visit next week and so I think I’ll have to wait to make these with her! 🙂
Thanks so much, Anne Marie, for the sweet compliment! I hope that you do decide to make a few with your mom while she is visiting! That would be so fun! Thanks so much for stopping by our blog and commenting! We love hearing from our readers! BTW… your blog is gorgeous! Excited to find you and follow your vegetarian, marathon running way of life! xoxo, sara
You are too kind! So glad you like my blog, as I am super inspired by yours! I will let you know if I make these pumpkins with my mom, along with your vanilla spice donuts, Halloween rice crispy treats, chocolate chip pumpkin bread… 🙂
Gorgeous! I love it:) beautiful for the entire Fall season.
Your mama is so talented! Thank you for sharing how to make it. Great DIY project.
We should make a few together, Jam! The original one my mom made me is still looking lovely in the middle of my dining room table! xoxo
These are indeed lovely! Was also surprised that you didn’t cut into the pumpkins, but am also surprised that the hot glue doesn’t damage the succulents. This doesn’t kill them?
It doesn’t, Rosie! So amazing… I guess the ends do better when they are dried out anyway… I have had mine as the centerpiece on my table for the past month and it still looks good! I will plant it in my yard soon! xo
AWESOME SAUCE! Are you taking orders? 🙂
You’re the sweetest, Miss Kelly! We adore you! xoxo
Making this for my birthday party tomorrow night!! I hope it comes out just as beautiful.
Hi Danielle! I hope you love how the pumpkin succulent turns out! LMK what you think! Happy Birthday, too! xoxo
Where do you get the moss at? Fo they have it at the nursery as well? So cute i wAnt to make these! Thanks for a cute idea rhat can then be planted.
You can get the moss at any craft store or sometimes they carry it at local nurseries. Sometimes our best luck is at Michaels. Thanks for stopping by! xoxo
I have purchased the moss from my local safeway in the floral department.
I made one for A FRIEND….. It came Out so pretty!!!!!
Will be making afew more for the feeling of fall!!
I can’t find the adhesive you used. Will any one work? Does it need to be waterproof so the misting doesn’t disrupt it?
I think any spray adhesive would work! 😉
I found spray adhesive at both Walmart and Target in the craft departments. What a beautiful and impressive arrangement!! I don’t think I’m talented enough to make this, but I love it anyway!!
I love this PROJECT. i ESPECIALLY LOVED THE dIRECTIONS. i WANTED TO KNOW IF YOU OR YOUR MOTHER WROTE IT. wAS SO EASY TO FOLLOW AND NOTHING WAS LEFT OUT.
How sweet, Billie! I wrote it with the help of my lovely mother’s verbal directions! 😉 I hope yours turned out gorgeous!!!
I was curious whether this might work with an artificial pumpkin, or do the succulents need the pumpkin to grow in to? We don’t have a whole lot of luck with pumpkins inside during late fall as the dry heat tends to rot them pretty quickly, even when they aren’t cut (My apologies for the all Caps, I can’t seem to get the caps lock off).
I was also wondering about using artificial pumpkins. Want to make them this weekend and no pumpkins here yet!
Or, what about a large acorn squash??
yes a lady in my succulent group says you can do that and then pull them off with the moss and plant them if you want to. or leave them on top for months!
2 years later and this is still awesome! 🙂
I own a lawn care business and I try to share decorating ideas with my customers. most of them are very old but this is so easy I am going to share it with them.
Very nice idea. Thanks for sharing this blog.
I love your style and that you decorate with a sense of humor! And I really love your “life the way it is” photos at the end of this post! Thanks for being normal!! Must get your book!
This is so pretty, ! You’re so talented. I love all the little figures and colors. Adorabl Hugs
This is so pretty, ! You’re so talented. I love all the little figures and colors. Adorable Hugs
I LOVE THIS IDEA BECAUSE i USED THE SAME IDEA FOR DECORATION IN MY YESTERDAY PARTY AND EVERYBODY LOVED IT. i WANT TO THANK YOU FOR THIS INFORMATIVE BLOG.
This is so beautiful and amazing in fact the color is awesome. I love this. Thank you so much for sharing this blog.
This looks amazing. We just wanted to thank you again for sharing this project with the world!
Your point of view caught my eye and was very interesting. Thanks. I have a question for you.
Your point of view caught my eye and was very interesting. Thanks. I have a question for you.
You have a real talent for connecting with people
Thank you for your sharing. I am worried that I lack creative ideas. It is your article that makes me full of hope. Thank you. But, I have a question, can you help me? https://www.binance.info/register?ref=P9L9FQKY
Alright, so i33win popped up on my radar. Solid site layout, not gonna lie. Games are okay, maybe could be better, but not bad. Give it a shot and see what you think: i33win
Gonna jump into pkr999game and see what all the fuss is about. Anyone got any tips for a newbie? Ready to rumble: pkr999game
Alright everyone, checking out ckbet1br. Seems new, but the selection of games is actually pretty impressive. Gonna throw a little down and see what happens. Let me know if any of you have tried it! Find it here ckbet1br.
Excellent post. I was checking continuously this blog and I am impressed!
Extremely useful information specifically the last
part 🙂 I care for such info a lot. I was seeking this particular information for a
very long time. Thank you and good luck.
Hi there! I just wanted to ask if you ever have any issues with hackers?
My last blog (wordpress) was hacked and I ended up losing months of hard work due
to no backup. Do you have any solutions to protect against hackers?
Hello there I am so happy I found your web site, I really found you by mistake,
while I was searching on Aol for something else, Anyhow I am here now and would just
like to say many thanks for a fantastic post and
a all round enjoyable blog (I also love the theme/design), I don’t have time
to look over it all at the moment but I have saved it and also added your RSS feeds, so when I have time I will be back
to read a lot more, Please do keep up the fantastic work.
This blog was… how do I say it? Relevant!! Finally I’ve found something that
helped me. Cheers!
Thanks in support of sharing such a good opinion, post is nice,
thats why i have read it fully
I read this post completely on the topic of the difference of most recent and preceding technologies,
it’s amazing article.
Hello, i think that i saw you visited my website so i came to “return the favor”.I
am attempting to find things to enhance my web site!I
suppose its ok to use a few of your ideas!!
Yo, CK999game is pretty dope! A good selection of games and it’s easy to find what you’re looking for. What are you waiting for? ck999game
Having trouble logging into y888game? I had the same issue, but resetting my password worked like a charm. The site itself is cool once you’re in. Good luck! y888gamelogin
Downloaded the z777gameapk earlier today. Installation took no time, and the app runs super smooth. I’m quite impressed. Recommended if you are looking for a new game app! z777gameapk
Mais tout a commencé dans les années 60, alors que la mode connaissait une révolution majeure.
This post made me reflect deeply on all the beautiful things in my life
Really love how you present information in such engaging and memorable ways
I’m impressed, I must say. Seldom do I come across a blog that’s equally
educative and interesting, and let me tell you, you have hit the nail on the head.
The problem is something which not enough folks are
speaking intelligently about. I’m very happy that I came across
this during my hunt for something regarding this.
Brilliant insight here
Hi, I think your web site could possibly be having internet
browser compatibility problems. When I look at your website in Safari, it looks fine however,
if opening in I.E., it has some overlapping issues.
I simply wanted to give you a quick heads up! Other than that,
fantastic website!
І will right away seize your rss feed as I can’t іn finding you e-mail
ѕubscription hyⲣerⅼink or e-newsletter service. Do ʏou hve any?
Kindly let me reaⅼize inn order that I may subscribe.
Thanks.
Choosing tthe riЬһt website framework іs one of the most important decisions when building a
professіonal website. A fast loading WordPrss thyeme diгectly affects user experience.
The ᏔP Astra framework has become widely recognized as one of thee fastst WordPress themes availaƅle.
Its clean coding structure ensսres minimal render-blockingresources.
When uѕers upgrade to WP Astra Pro, they unlock advanced custօmization capаbilities.
Theѕе features allⲟw greater contгol over layout structures.
Website speed рlays a major role in Ꮐoоgle search rankings.
A performance-focused theme like Astra helps maintain fqst ⅼoading timws
even as content grows.
Unlikе many multipurpose themes that rely on heаvy
design frameworks, thе Astra framework uses a
modular system. Onlyy necessary feɑtuгes are activated, which reduces plugin conflicts.
Upgrading to Astra Ⲣro als᧐ prߋvides advɑncced header
builders, stіcky navigation, and еnhanced layut optіons.
This ɑllows businessss tto build a professional οnline preѕence without
relying on multiple third-party plugins.
For bloggers and content creators, the premmium Ꭺstra upgrade
inclues advanced blog layout controls such as grid formats, custоmm metadɑta positioning,
аnd feɑtured content styling. These elements іmprove reader engagement.
Tһee foundation of a successful websіte begins with ѕped
and structure. A mobile responsive WordPreѕs theme ensures that growth does
not compromise performance.
Search engine optimization requires more than keywords.
A schema-ready WordPresѕ framework helps searcһ engines crawⅼ and index content efficiently.
The WP Astfra Pro еxtension includes structured layout ⅽontrolѕ that support better heading hierarchy.
These techniсal advantages contribute to stronger organic viѕibility.
Many website owers searcһ for hrɑses such as “Astra Pro feɑtures,
” “Ꭺstra ᎳordPresss theme review,” and “best
pгemium WordPress theme.” Τhese queries reflect demand ffor a theme that balances SEO readiness
and design control.
For WooCommеrce stoгe owners, the Рrro upgrade offers enhanced shop customization. Featurеs
inclᥙde optimized product grids, custom checkout layouts, and distraction-frеe shoⲣping modes.
These improvements support conversion rate optimization.
Agencies and developers benefit from Astra’s modular activation system.
Only necessаry modules are enabⅼed, which prevents backend complexity.
This makes Αstra suitable foor managing multiple client websites.
Рriсing flexibility is another advаntage. Users can choose between annuɑl plans
or lifetime licenseѕ depending on business needs.
C᧐mpared to other premium WordPress themes, the Astra premium
add-on remains high value for agencies.
As weƄsites scale and traffiс increases, performance consistency becomes critical.
A lightweight WorɗPress framework ensᥙres that growth does not negatively impact loading speewd
or search visibility.
Selecting WP Astra Pro proviԀes long-term stability. Instfead of switching
themes repeаtedly, useгs can expand their website while maintaining SEO compatibility.
Having access t᧐ Astra Pro changes the wayy you approach
webѕite development. Instead oof worқіng аrοund theme restrictiоns, you oρerate with
a modular system. Thhis allows businesses and creatоrs to focus on content quality rather than technical obstacles.
One noticeable difference after upɡrading to the Proo version іs the level of control
available. The plugin provides ɡranular confіguration oѵer һeaderts and footers.
Rathe than accepting rigid defaults, useгs can align every struϲtural element with SEO strɑtegy.
For agencies, having the prfemium veгsion installed ensures
consistent performance acr᧐ss deployments. The modular activation system enables only the features you
actᥙaⅼly need, which prevents unnecessary backеnd ⅼoad.
A long-term benefit of chоosing this premium WordᏢress upgrade iis future-proofing.
WordPress evolves regularly, introducing new editoг featurеs and performance standaгds.
Astгa’s development team continuously updates the framework to maintain compatіbilitfy witth
nnew releases.
From a development peгspective, Astfa Pro uses сonditional asset
loading. Pages load only the resoսrces requird ffor tnat layοut.
Ovveг time, this approach supⲣorts strongr Core Wеb Vitals
performance.
Another imporant advantage of using astra pro vs free comparison Pro is reɗuced ρlugin dependеncy.
Insteɑd of installing multiple layout or header plugins,
Astra centralizes advanced customization inside one optimized system.
This reduces msintenance compⅼexity.
Forr WooCommerce store owneгs, the premium module provides enhanced shop controls such as custom product grids.
These imprоvements can positively іmkpact averɑge order vaⅼue.
Many userѕ reseɑrching the Asta WordPress theme
search forr phrdases like “Astra Pro features,”“Is Astra Pro
worth it,” and “best fast WordPress theme.” The consistent feedЬack highlights its speed advantage.
Beyond deѕigvn flexibility, Astra Pro sսpportѕ strаtegic
conteent structuring. Users can adjust ɑrсhive laʏouts.
These refinementѕ contribute to better content
hieгarchy.
As websites grow and traffic incгeases, hɑving a lightweight
WordPress ttheme becomes еven more important. Astra’s
minimal footprint ensures that ցrowth does not compromise searⅽһ engine performance.
Ultimately, choosing Astra Pro is about buiding on a scalable WordPess sуstem.
Instead of redesigning every year, you can expanbd confiԀently ԝhile maintaining speed, fleхibіlitу,
and SEO compatibility.
Pretty! This was an incredibly wonderful article.
Thank you for supplying these details.
Good day! This is kind of off topic but I need some guidance from an established blog.
Is it tough to set up your own blog? I’m not very techincal but I can figure things out pretty
fast. I’m thinking about setting up my own but I’m not sure where to
start. Do you have any points or suggestions? Cheers
I love your blog.. very nice colors & theme. Did you make this website yourself or
did you hire someone to do it for you? Plz respond as I’m looking to construct my own blog and would
like to know where u got this from. appreciate it
I always used to read article in news papers but
now as I am a user of internet thus from now I am using net for posts, thanks to web.
Admiring the hard work you put into your blog and detailed information you offer.
It’s nice to come across a blog every once in a while that isn’t the same outdated
rehashed information. Great read! I’ve bookmarked your site and I’m
including your RSS feeds to my Google account.
Hi there! Do you know if they make any plugins to protect against hackers?
I’m kinda paranoid about losing everything I’ve
worked hard on. Any suggestions?
Thanks to my father who told me on the topic of this blog, this weblog is in fact amazing.
Yes! Finally someone writes about slot gacor.
Everything is very open with a clear explanation of the challenges.
It was really informative. Your website is very helpful.
Thank you for sharing!
Ea77login. Quick login is something I appreciate. No hassle, just straight to the games! Give it a shot and see what you think at ea77login.
Alright, so I cruised over to joy9win to see what’s up. Gotta say, the site’s pretty slick. Found a few games I dig, and had some decent luck. Not gonna lie, lost a bit too haha, but hey, that’s how it goes, right? Check out joy9win and let’s get betting!
Alright, I checked out encalientemx. Good variety of selection, I will be happy with it. I’ll probably sign up for fun some time. See for yourself in encalientemx.
Camberley is a thriving town with diverse property types—from period homes near the High Street to modern residential developments and purpose-built rental properties.
In addition to one-off emergency repairs, we also provide ongoing roofing services.
Proper roof installation serves as the cornerstone of
your home’s protection, ensuring longevity and safeguarding against the
elements.
I was very pleased to find this web site. I want to to thank you for your time for this particularly fantastic read!!
I definitely loved every bit of it and i also have you
saved as a favorite to check out new stuff
on your website.
Regulatory changes can also affect market access, product compliance, and operational strategy.
If more than 1 vaccine is given in the same limb, they
should be given at least 2.5cm apart.
At Market Research Intellect, our mission is to bridge the gap between data and decision-making.
Hi, I read your blogs on a regular basis. Your humoristic style is witty, keep
up the good work!
Winter Roofing in Avon addresses ice dams,
snow damage, and cold-weather roof leaks.
Hey! This is my 1st comment here so I just wanted to give a quick shout out and say
I genuinely enjoy reading through your posts.
Can you recommend any other blogs/websites/forums that deal with the same subjects?
Many thanks!
bayar bayar bayar bayar bayar bayarbayar bayar bayar
bayar bayar bayarbayar bayar bayar bayar bayar bayar bayar bayar bayar bayar bayar bayarbayar bayar bayar bayar bayar bayarbayar bayar bayar bayar bayar bayar bayar bayar bayar bayar bayar bayarbayar bayar bayar bayar bayar bayarbayar bayar
bayar bayar bayar bayar bayar bayar bayar bayar bayar bayarbayar
bayar bayar bayar bayar bayar
Kudos. Useful information.
Hmm it looks like your website ate my first comment (it was extremely long) so I guess I’ll just sum it
up what I had written and say, I’m thoroughly enjoying your blog.
I as well am an aspiring blog blogger but
I’m still new to everything. Do you have any points for newbie
blog writers? I’d really appreciate it.
Regards! Excellent stuff.
Appreciate it. Numerous tips!
You anjing mentioned that terrifically.
Reliable content Cheers!
Very good info, Thanks.
Thanks for your marvelous posting! I actually enjoyed reading it, you can be a great author.I will make certain to bookmark your blog and may come back in the foreseeable
future. I want to encourage that you continue your great writing, have a nice weekend!
You have made your position pretty well!!
Point well utilized!.
Hi there! I know this is kinda off topic however , I’d
figured I’d ask. Would you be interested in trading links or maybe guest
writing a blog post or vice-versa? My website addresses a
lot of the same subjects as yours and I feel we could greatly benefit from
each other. If you might be interested feel free to shoot me an email.
I look forward to hearing from you! Superb blog by the way!
Thanks for sharing your thoughts on . Regards
Every weekend i used to visit this web site, for the reason that i wish for enjoyment,
for the reason that this this website conations actually fastidious funny information too.
Opa, artigo leve e direto. cassino brasileiro na minha experiência e funciona. Sucesso!
Fala, pessoal, não tenho certeza se sobre jogo do bicho digital? alguém já ganhou com isso? 22Bet